HBO Max is included free of charge with the new AT&T fiber internet service at Opera Plaza (Internet 1000). To take advantage of this perk, download the HBO Max app to your Smart TV, streaming device (Roku, Firestick, Apple TV, Chromecast), tablet, or smartphone. Then sign into the app using your AT&T account login information after your new AT&T service is activated.

To sign in: 

  1. Launch the HBO Max app
  2. Choose “Sign in to your account” from the menu
  3. Scroll down to “Sign in with a provider”
  4. Select AT&T as your provider
  5. You should see a login screen with the AT&T logo
  6. Sign in using your AT&T account login information

If you don’t know your AT&T login information, you may have to do a password reset on your AT&T account using the email address that’s associated with your AT&T account. Be sure to log in using your AT&T account information. If you log in using an existing HBO account or if you create a new HBO account, you won’t be able to stream HBO Max free of charge.


The ATT crew has begun activating the new super-fast fiber internet service at Opera Plaza. You’ll receive a notification from the HOA when it’s your turn to sign up for installation. Here are some things to think about before you have your new fiber internet service activated.

Think about where you’d like the new ATT gateway to be placed in your unit

The new fiber gateway (BGW320) must be connected to the fiber jack in your unit with fiber cable, so it can’t be connected using whatever wiring you already have in your unit (most likely coaxial cable). For example, if the fiber jack is in your bedroom and you want the new gateway to be placed in your living room because that’s where your current gateway is placed, the ATT crew will have to install new cable. Be prepared to move any furniture that’s along the pathway of the cable installation. The good news is that the fiber cable is much skinnier than coaxial cable and therefore much easier to hide.
HOWEVER, the new gateway doesn’t necessarily have to be in the same place as your current gateway. The WiFi in the new fiber gateway is many, many times better than the WiFi in the previous ATT gateway. I’ve been testing it and the WiFi seems to be about 30-40x faster (600-700mbps).  If you can connect all of your devices (e.g. computers, tablets, smart TV, streaming devices) to the new gateway via WiFi you may want to place the new gateway close to the fiber jack (the outlet that ATT installed in your unit earlier this year), without running any new cable through your unit. Be sure to have the installer check the WiFi signal in your unit, especially both upstairs and downstairs if you have a townhouse. 

Here’s some advice on where to place your gateway: 
Lifewire: Get Better Wi-Fi: Here’s The Best Place for Your Wireless Router
CNET: Want better Wi-Fi? Here’s the best place to put your router

The gist of it is: 

  1. Put the gateway in a central spot in your unit (not next to an exterior wall)
  2. Put it in a higher location, not on the floor
  3. Keep it away from other electronics that could cause interference
  4. Keep it away from reflective surfaces (something to think about if you have mirrored walls or closet doors)
  5. If you have a townhouse, I think that it’s probably better to put the gateway close to the stairwell

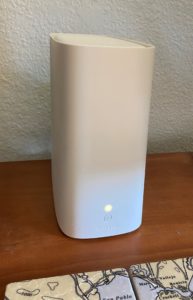
The new gateway is much nicer looking than the old gateway, and it only has one light. The dimensions are: 7 1/2″H x 3 1/2″W x 8″D

If you have any trouble scheduling your appointment with the ATT call center, contact the HOA office. Be sure to return the old ATT gateway or you’ll be charged for it. Equipment can be returned by bringing it to the UPS store.

Lastly, go ahead and install the ATT Smart Manager app on your phone now. If you don’t know your ATT account login information, try to get that sorted out before your installer arrives. The app will allow you to test your internet speed and see what devices are logged into your home network. You can also use it to change the name of your WiFi network (SSID) and your WiFi password. 
Apple App Store
Google Play Store 
Web page

Uverse TV service will no longer be included under the Opera Plaza HOA contract

Once Opera Plaza transitions to the new internet service, Uverse TV service won’t be covered by the HOA contract.* If you don’t terminate the Uverse TV service and return the DVR you will be charged ($120+/month). It will easiest to cancel the TV service and return the DVR(s) at the same time that you return the gateway. If you don’t do this, you’ll have to make another call to ATT to cancel the TV service.
If you have any recordings that you want to watch on a Uverse DVR, watch them now. 
If you’re a TV watcher, I strongly recommend that you buy either a) a smart TV or b) a streaming device and try it out before you switch to the new internet service (if you haven’t already done so). If you have an early smart TV (pre-2016 or so) that has a limited universe of apps (you can’t download new apps) you may want to add a streaming player to it.
If you don’t want to pay for TV service, you can attach an inexpensive digital antenna (<$20) to your TV (I keep a small supply of antennas on hand). This will allow you to receive all the major broadcast networks (ABC, CBS, Fox, NBC, PBS) live from Sutro Tower. The inexpensive, unamplified flat panel antennas seem to work best. This is one case where spending more does not get you something that works better.

*ATT will allow Opera Plaza residents to keep Uverse TV service. However, the cost to you will be well over $100, so in my opinion there are more cost-effective live TV options. Please see my earlier post.

Hopefully by now you’ve bought a smart TV or a streaming device like a Roku or Firestick in preparation for the switch to our new fiber internet service and you’ve got it working. Maybe you’ve even started watching shows on Netflix, Hulu, Peacock or some other streaming service. But in my opinion one of the best streaming services that you can access with a smart TV or streaming device is PBS Passport. With PBS Passport you can watch all of your favorite PBS shows whenever you like. If you’re a KQED member (or a member of some other PBS TV station) you can access the entire catalog.

Here’s how to do this. It’s a two-step process. (1) Activate the PBS Passport benefit from your PBS station, then (2) activate Passport on the device that you’ll be using to stream shows.

Activating the PBS Passport Benefit

First, if you’re already a KQED supporter, check to see if you’re eligible for Passport (generally requires a minimum annual donation of $60) here. If you’re in the KQED member database, you should quickly get an email with information about how to activate your PBS Passport benefit, including an activation code, which you’ll enter here. If you haven’t already created a PBS account, you may be prompted to create one. Be sure to write down the password. If you’re not a KQED member (or member of some other PBS TV station) you’ll have to become a member first. If you’re a member of KQED but your email isn’t in their database, you will probably have to contact KQED member support.

Activating PBS Passport on your TV or streaming device

Once you’ve activated your PBS Passport benefit, the next step is to associate your benefit with the PBS app on your TV. install the PBS app on your smart TV or streaming device. When you open the app, you should see a screen that prompts you to activate Passport. When you click that button, you’ll see activation instructions, including another yet another activation code (this is different from the benefit activation code mentioned in the paragraph above). Go to your laptop or tablet and navigate to this device activation page: https://www.pbs.org/activate/. Enter the activation code displayed on your TV or streaming device on this page. You’ll be prompted to log in to your PBS account. If you don’t know the password, you may have to do a password reset. Wait a few seconds after entering the activation code and your TV should return to the main PBS menu, and you should be able to play any of the videos (including those with the compass symbol that shows that it’s only available to Passport members). 

Check out the impressive catalog of shows that you can watch, anytime, anywhere.

You can find more information about PBS Passport here.

Need help? Send me an email at: HELP@TeineiTech.com


When you switch to the new ATT fiber service, ATT technicians will install a new router for you. This is the piece of equipment that connects all of the equipment in your house — smart TVs, laptops, smart home devices, etc. — to the internet. To be sure that everything is re-connected to the internet after the changeover to the new fiber service, it would be a good idea to take an inventory of everything that you currently have connected to the internet.

How do you do that?

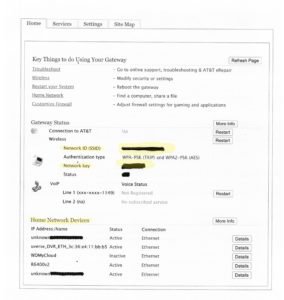
It’s actually very easy. Using a computer that’s connected to your home network open this web page: http://192.168.1.254/

The page will look something like this:

It would probably be a good idea to print out a copy of this page for future reference.

(If you’re one of my clients with a Netgear router behind the ATT router, log in here to see a list of connected devices: http://routerlogin.com/)

The Network ID (SSID) is the name of your own home network. If you never changed this, it might say something like 2WIRE123. The Network Key is your Wi-Fi password. This is the information that you need to log in to your home Wi-Fi network.

Below that, you’ll see Home Network Devices. This is a list of everything that’s connected to your home network. Some devices have a wired (ethernet) connection. Some have a wireless connection. All of these devices will have to be re-connected to the new router in order for them to keep working after the transition.

There are basically two ways to get all your wireless devices reconnected after you get the new equipment:

  1. Write down the SSID and Network Key for the new router and log in to the new Wi-Fi network on every device using that information. This is the easiest route if you only have a few devices connected to your Wi-Fi network.
  2. If you have many devices connected to your wireless network, it might be easier to change the SSID and Network Key on the new router to exactly match the SSID and Network Key from the old router. This should allow all of your devices to login to the new router as if nothing changed. The new router should come with the access information needed to change these settings. This information is often printed on a sticker attached to the device. 

Need help? Contact me at HELP@TeineiTech.com

Almost all Opera Plaza units have been wired for the new high-speed internet service, so the transition will probably get underway soon. Keep your eye out for communications from the HOA. As the change gets nearer, I’m getting more questions about what to do about TV service when the Uverse TV service ends. 

First, if you’re paying for cable TV service at another location like a second home, under some circumstances you might be able to access that same service at Opera Plaza at no extra charge via a smart TV app. For example, DISH has an app that works on Amazon Fire TV devices and Xfinity has an app that works on some devices. Also, if you pay for cable service from a company other than ATT (Uverse) you can use the username and password for that cable account to log into many standalone apps on a smart TV, like CNN and the Weather Channel.

Money-saving option

If you want to keep your cost down, you might want to consider using an antenna to receive live local TV channels like KTVU (Fox), KPIX (CBS), KGO (ABC), KQED (PBS), KNTV (NBC). Then pick streaming services that carry the cable channels that you like to watch (CNN, ESPN, etc.). Also keep in mind that many cable channels now have their own apps, so you if really just watch one or two cable channels, it might be cheaper to just subscribe to those channels rather than a full package. Pluto is free, so it’s absolutely worth it to install the app and try it out if you want to save money. I keep a small supply of inexpensive (but effective) flat antennas on hand. Contact me for installation.

Convenience option

If convenience is more important than cost, you might want to consider what I would call a full cable replacement live TV streaming service. These services provide both local channels and national cable channels through a single app. They essentially function just like cable TV, with recording in the “cloud” rather than a box connected to your TV. The services that offer both local and national channels in one app are: YouTube TV, Fubo TV, HULU + LIVE TV, and DirecTV Stream.

How to choose a live TV service:

  1. Keep a log of your TV viewing habits. What channels do you watch? What shows do you watch?
  2. Print out a copy of this spreadsheet. Use a highlighter to mark the rows for the channels that you watch, all the way across the page.
  3. Now look down the columns to see which streaming services carry the services that you like to watch.

Almost all of the services offer a free or discounted trial period. Unlike cable services, which require an annual contract and special equipment, it’s easy to try out different services. It’s also possible to use these services to watch TV wherever you travel using your laptop, tablet, mobile phone or by logging into an app on a smart TV. The only exception to this is DirecTV Stream, which ties your service to your home network, and restricts your ability to use the service to watch on a TV at another location (boo!).

Need help sorting it out? I’m here to help.

Send me an email

There have been a lot of questions about how to record TV shows after the Uverse service (and the cable box) goes away. I’ll try to offer some answers here.

Maybe you won’t need to record

First of all, once you start using streaming services you may find that you don’t really need to record your favorite shows, because many are available on demand. The IMDB.com website is an encyclopedia of virtually every movie and TV show ever created. The page for each show displays information about the streaming services that carry that show.

Recording over-the-air shows

If you want to record over-the-air shows from Sutro Tower (like the local evening news, sports events, or network shows), I’ve tested and I can recommend the Tablo OTA DVR. Instead of connecting an antenna to your TV, you attach it the Tablo, and then the Tablo records and sends the content to your TV.

There are two types of Tablo DVRs: 1) devices that connect directly to your TV via an HDMI cable and 2) devices that stream content to your TV over a wifi connection to an app installed on your smart TV or streaming device. It’s important to know that some of the devices have internal memory to store your recordings, and some require an external hard drive. The number of tuners controls the number of shows that you can record or watch at the same time. Dual (2 tuners) = 2 shows at once (ie watch one show while recording another show), Quad (4 tuners) = 4 shows at once. To get the most out of these devices, you’ll need to subscribe to the Tablo TV Guide Data Service for about $60/year.

Network-connected Tablo

If you choose a network-connected Tablo DVR, you can place the OTA antenna and Tablo in a location for optimal TV reception, even if this isn’t close to your TV. The Tablo broadcasts the OTA shows to an app on your smart TV or streaming device via your wifi network, so the Tablo doesn’t have to be physically connected to your TV. In fact, the Tablo can also stream to an app on your iPhone or iPad. Because the Tablo can stream TV shows to many kinds of devices, it can be useful even if you don’t record shows. Want to watch the Late Late Show in bed on your iPad? No problem! One caveat, however: if you live in a townhouse, you may experience trouble getting the wifi signal from one floor to another (I currently recommended a mesh router setup to solve this problem, which I believe is caused by the steel rebar in the concrete floors, and there is a chance that this situation will improve with the new fiber service).

TV-connected Tablo

If you don’t have a smart TV, and you’re only interested in watching local TV stations, a TV-Connected Tablo hooks up directly to your TV and comes with its own remote control.

Cloud recording

Most of the cable replacement (live TV) streaming services offer cloud-based recording. Using these services, you record shows in the cloud (on say a Sling or Hulu server), and then you retrieve the shows from the cloud when you want to watch them. There may be some limits on what you can record, though, depending on the streaming service’s agreement with the content provider.

To give you an idea how cloud recording works, here are some examples:
https://www.sling.com/value/dvr

https://help.hulu.com/s/article/cloud-dvr

https://help.philo.com/using-philo/dvr

https://www.directv.com/stream/technology/cloud-dvr/

Need help figuring out the best TV options for you? Send me an email at: HELP@Teineitech.com
 

We’ve all heard the nightmare stories about water leaks here at Opera Plaza. Maybe your own dishwasher line sprang a leak and wrecked your cabinet. Or maybe your upstairs neighbor had a leak that wrecked your ceiling. Thanks to the Internet of Things (IoT) there are now relatively cheap leak detectors that connect to your wifi and send a notification to your phone and/or email when they sense water. If you’re away from Opera Plaza, this gives you a chance to ask someone to go into your unit and track down the problem right away. If you’re home, they also make an audible alarm.

I tested two different units and researched several others, and for now I’d like to recommend the Govee WiFi Water Sensor. It’s less expensive than some of the other options, it’s fairly easy to install, and so far it seems to be reliable. Of course, I can’t guarantee that it will be 100% foolproof, but for the price it seems like a piece of technology that’s worth having. You’ll need an available electrical outlet and your wifi login information to install the hub that communicates with the sensors.

(I receive a small commission for purchases through these Amazon links; feel free to buy wherever you please)

Govee WiFi Water Sensor 2 Pack + hub (1 for the kitchen, 1 bathroom)

Govee WiFi Water Sensor 3 Pack + hub (1 for the kitchen, 2 bathrooms)

Govee WiFi Water Sensor 2 Pack (add-on sensors for behind the fridge or other locations)

Get in touch with me at HELP@TeineiTech.com if you need help with installation.

With more and more places of business requiring proof of vaccination, you might want to keep a copy of your COVID vaccination record on your mobile phone. In this post, I’ll show you how to access your proof of COVID vaccination with a single click on your iPhone. Check out the video at the bottom for a demonstration.

There are two easy ways to do this: (1) you can take a photo of your card with your mobile phone or (2) you can take a screen shot of the QR code provided by the State of California.

To generate the QR code, visit: https://myvaccinerecord.cdph.ca.gov/
Once you’ve received the link to your QR via email or text message, open it on your phone and take a screenshot of the code.

If you have an iPhone, you can create a “Widget” to access your proof of vaccination directly from your home screen. (For information about iPhone Widgets see: https://support.apple.com/en-us/HT207122)

  1. Use your iPhone to take a photo of your card or a screenshot of the QR code
  2. Open the “Notes” app on your phone and create a new note with text like “COVID Vaccination”
  3. While in the new note, select the camera icon to insert the photo or screenshot of your proof of vaccination into the note
  4. Return to the Home Screen and press on any blank area to customize your Home Screen (the Apps will begin wiggling on the screen). Select the “+” symbol at the top left corner to add a Widget to the Home Screen
  5. Scroll down the list of available Widgets until you reach “Notes.”
  6. Swipe right until you see “Note. Get quick access to one of your notes” and then select “Add Widget” at the bottom of this screen
  7. Once you’ve created the “Note” widget, you can select the exact note be displayed if it isn’t showing your proof of COVID vaccination. Press down on the the “Note” widget to open the menu, select “Edit Widget,” and then choose the Note that contains your COVID vaccine information. 
  8. Now you will have instant access to your proof of COVID vaccination by simply pressing the Note from your Home Screen!

The Uverse subscription that you have as an Opera Plaza resident gives you access to NBC’s Tokyo Olympics content on a number of platforms. Contact me if you need help getting access or figuring out where to find the coverage of your favorite sport.


Uverse cable service

KNTVHD 1003
USAWHD 1125
CNBCHD 1216
NBCSNH 1640
GOLF 1641


Uverse app

https://watch.att.com/uverse-tv/ (scroll to the bottom of this page for app download links)

Download the Uverse app for Android or iOS to stream Uverse TV channels (including the above) to your handheld device.
The Uverse App makes it easy to search for specific Olympic events on TV. You can also use the app to set your DVR to record events. You’ll need your ATT Uverse account login information to sign in to use the app.


NBC Olympics website

https://www.nbcolympics.com/

You will need your ATT Uverse login information (or login information from your account with another cable provider) to have full access to the NBC Olympics website.


NBC Sports App

https://www.nbcsports.com/sports-mobile

Download the NBC Sports App to your Adroid or iOS device to watch NBC Olympics coverage on your handheld device. For full access, you will need to log in with your Uverse (or other cable provider) account.


Peacock

https://www.peacocktv.com/

Download the Peacock App to your Smart TV (or Roku, Amazon FireTV, or AppleTV) or handheld device to access some (but not all) Olympics coverage. You will need to sign up for a Peacock account to access the content.

Are your passwords a mess? Do you keep forgetting and resetting them? Or worse, do you use the same password for everything? Let’s make this the year that you get your passwords under control. As mentioned in an earlier post, password management should be part of your overall online security plan.

Here are some general password guidelines:

  1. Set a different password for every website
  2. Passwords should be at least 8 characters long and include special characters (like &$#)
  3. Passwords should not be a common word or phrase (“ILovemydog”)
  4. Passwords should not contain personal information (children’s names, birthdays)
  5. The longer the password, the stronger. Consider using long passwords (15 characters or more) for sensitive websites like financial institutions.
  6. Also consider using passphrases for sensitive sites. A passphrase is a nonsensical phrase that is long (making it hard to hack) but containing words that you can probably memorize. An example of a passphrase is “preachy glutton legislate shorter monsoon author.” Here’s a discussion of how to create passphrases: How to Create a Strong Password — That You Won’t Forget

Now how on earth are you going to keep track of all these passwords? If you use only Apple devices, you might take advantage of Apple’s “keychain” technology to create and store your passwords. If you have a mix of Apple and non-Apple devices, you might consider using a password manager like LastPass or Dashlane. These password managers work on virtually every kind of device (iPhones, Android phones, MacBooks, PCs) and can create and store strong passwords for you. Let me know if you need help setting these up.

But it’s also possible to store passwords in a low-tech way. You can keep them written in a notebook, of course. But recently a client showed me her brilliant solution: she keeps them in a card file box. This makes it easy to add and update cards and sort them alphabetically by website. Worried about someone getting into your home and finding it? Put them in a cute recipe box and store it in a kitchen cupboard far away from your laptop!